
You can easily create and submit expense reports for any out-of-pocket business expense including mileage reimbursements calculated automatically. Status changes made by your Org Approver will be communicated via email. You may review reimbursement reports at any time by visiting the My Wallet section.
Watch the video to see a step-by-step demo of how reimbursement reports work.
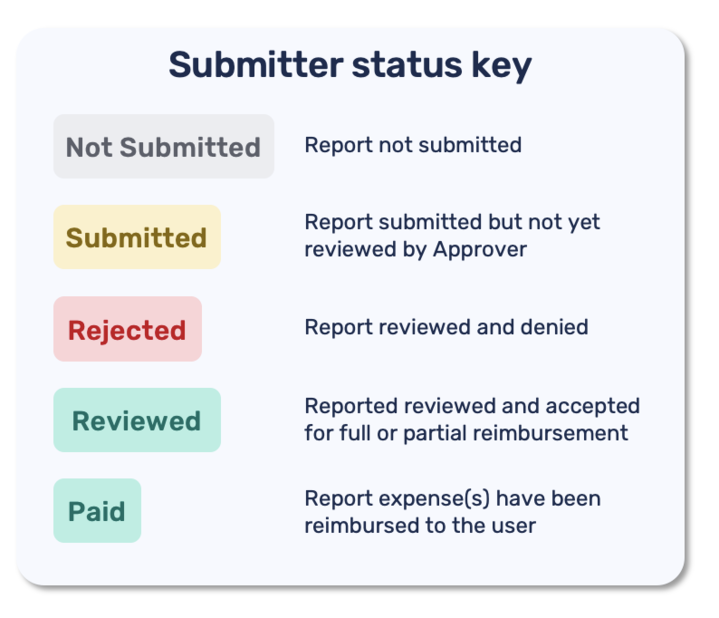
Note: Out of pocket expenses are not reimbursed through Extend, but your Org’s Approver may mark a report as “Paid” to denote that the reimbursement has been processed through payroll or another system.
On Web: Creating & Submitting a Reimbursement
1. To create a reimbursement report from the Web app, first hover on the Create New menu and select Create expense report.
2. Name your expense report and select Create Report and Add Expense
3. After you name your expense report, you can begin adding your expenses.
There are two ways to add your expenses:
- Upload Receipts to Generate Expenses: Save yourself some typing and let Extend do the heavy lifting. You can now upload up to 10 receipts at once, and our system will automatically scan them to create your expense report for you. Each receipt is turned into an expense line item.
-
Add Expenses Manually: Prefer to enter details yourself? You can always choose to add each expense manually. Start with the type of expense.
If a general expense enter expense name, date of purchase, and amount spent. You may also upload a receipt or any supporting documentation and enter any notes.
If a mileage expense enter you start and destination and any stops along the way. Extend will automatically calculate total distance and apply your organization’s mileage rate. You’ll also see a map preview of your route, so you can confirm everything looks right. If you prefer you can also enter the miles manually.
4. Once you’ve entered the expense details, you have two options:
a) To add additional expenses, select + Add Another Expense.Your expense will be saved, and you can enter the details of another expense in the fresh form that appears. You may add as many expenses to your report as you wish.
b) If you have no other expenses to add, select Save and Review. You will be taken to the Expense Report Details page for the expense report you created.
5. From the Expense Report Details page, you have the option to add, modify or delete expenses before submitting your report. Once a report has been submitted, you will only be able to update the receipt attachments and notes.
a) To add expenses, select Add Expense at the top right of the report.
b) To edit an existing expense, select the > (caret) for the expense you wish to modify. Save your changes by selecting Update Expense.
c) To delete an existing expense, you have two options:
1. To delete an individual expense, select the > (caret) for the expense you wish to delete and select Delete to remove the expense from the report.
2. To delete multiple expenses, select the checkboxes for the items you wish to delete and then select Delete
6. When you are ready to submit your expense report for review, select Submit Report in the upper right hand corner.
7. A pop-up modal will appear and you can select Confirm. After submitting your report, the status will automatically update to “Pending Review,” and your Org’s Approver will be alerted to review the new expense report.
FAQs
1. As a Submitter, can I add and edit my reimbursement reports from the mobile app?
Yes, you can manage your reimbursement reports from both the mobile and web apps.
3. How can users get updates on the status of their submitted reports?
The Submitter can view the real-time status of their report and will be notified via email and Notification Center any time the Approver modifies the status of their submitted report.
4. What happens if my expense report is rejected?
Your Approver can leave notes in your expense report to provide context on the rejection. At this time, you will need to create a new expense report if you need to make a correction to a rejected report.
5. What happens if an Org has not yet set an Approver?
Org members can still submit out-of-pocket expense reports. Once an Org Owner or Admin assigns an Approver for their Org, this user will have access to all submitted out-of-pocket-expense reports to review.
6. What happens to an expense report after an Org Member leaves their Org in Extend?
All submitted out-of-pocket expense reports will remain in the Expenses section if a user leaves an Org. If the user who left was the designated Approver, the Org Owner or Admin will need to assign a new Approver for their Org.
*Reimbursements are not available through all issuers. If you're not sure if you have this feature, please contact customer support.